2021 W3


Passive investment (#etf/index founds) usually (80%) beats active investment (active founds) in the long run.

If a person has to decide between getting 450 euro right now or a 50-50 probability of getting either 1000 euro or nothing, he most of the time selects the first. The “right” answer is the second.

Loss_aversion is very intresting and to always keep it in mind, in all fields.

Webflow is amazing.

YNAB is amazing. It may be just budgeting your money that is a way to know better what is wrong with you.

Tether may be a problem for crypto, but may be also not. The point is to not own them.

Short trem return in investment is a random walk. In crypto it’s a random run.

stadia is very good, more than what I expected.

A weekly summary of intresting things


I decided to take down notes on what I learn during each week and publish here.

During 2020 I found myself in learning new stuff. Mostly on topics that I was not basically aware off, one over all finance (personal/general).

I guess no one will ever look back, expect me. Still, a good exericise for the futre self.

Where is my time? How I keep track of my workdays: pt1


TLDR; In this post, I share a spreadsheet to track the workdays, find it here.


Since I started spending my days at the PC, I tried to educate myself on tracking how I spend my time. I’ve used several tools, good and bad. various techniques, Pomodoro TODOs and so on.

One day, I saw a thread on Hacker News (original post) that explained how in a company they track their day using LEGO. I’m a huge fan of LEGO, but that’s another story. The idea is to have various categories mapped to a LEGO brick color and for each hour you add a block on your day. At the end of the day, you have a tower of lego that represent your day. The category, were, somehow:

  • Planned: what you have planned to work on that day
  • AdHoc: something that pops up during the day or that was not planned
  • Meeting: Meetings, that is not actual work.
  • Failed: When you fail at your work

The idea is nice, simple, effective to have a recap and understand the day and later the month. However, I did not have time to find all the LEGO and I did not want to use them for work. Plus, I wanted a system that could last for a while and not stolen by my nieces to build up some fancy house or the-talles-tower-that-does-not-fall.

Long story short, I created a Spreadsheet to track every hour of my workday.

THE SPREADSHEET IS HERE

screenshotDD

You can copy it and personalize it. Make it yours, change the categories or whatever is needed to be changed.

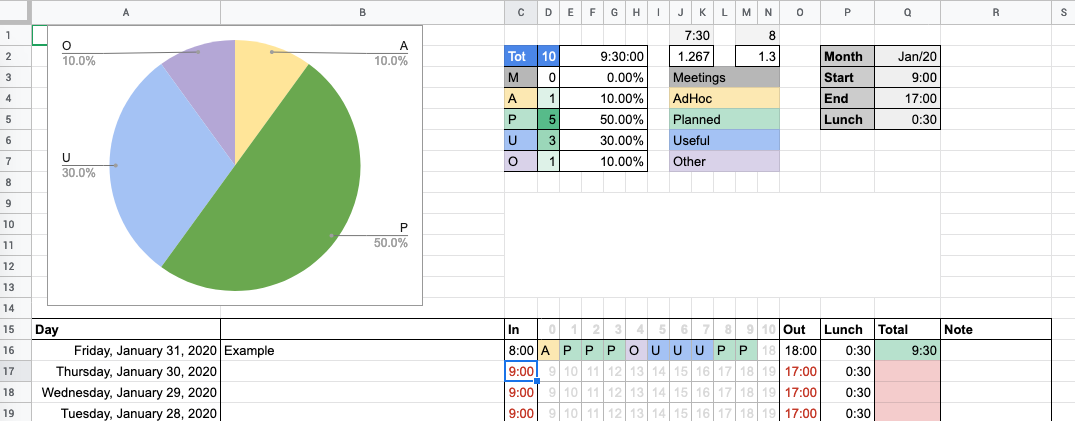
The categories are different:

  • Planned: what you have planned to work on that day.
  • AdHoc: something that pops up during the day or that was not planned for that day.
  • Meeting: Meetings, that is not actual work. we all know that.
  • Useful: When you have meetings, ad-hoc, anything that indeed is useful for your work.
  • Other: since fail is not really meaningful, I changed to Other to categorize anything that does not fall in the previous one.

This is the monthly logging system, in the top part there are variables to select the month, start-end time of your day, and how much time you generally spend for lunch. This info is copied in the table below to set up the date and begin/end of the hours to log.

To fill in a day:

  • For each hour, categorize it and write in the corresponding hour-cell the category, just the first letter (e.g. P for Planned).
  • Write the description, in the description field, the one next to the date.
  • Set In and Out time (use a value that is different from the variable set on top so the spreadsheet calculates the difference, it subtract lunchtime as well). You see the result it in total

The charts and stats automatically update.

With this system I’m able to:

  • Recall any day of the past 1.5 years (yes, I have kept track of my days since 1.5 years ago with this system)
  • See how I spend my time and plan better in the future. I would like to keep Planned tasks at more than 50%.
  • Have an idea of how long I’m staying at work, how long thing last in the various months.

Note: if you do more than one thing in a single hour, just pick the category that covers most of the time in that hour.


NEXT:

since keeping track of all this info is sometimes not easy, I’ve built (in reality, I’m still building) an application to keep track of the time at the pc and log my tasks. So filling up the spreadsheet becomes a piece of cake.


NOTE: I’ve used for ages rescue time. It’s a great tool to make you aware of how you spend your day, it logs EVERYTHING.


Kubernetes on Google Cloud Platform: Nginx-Ingress and TLS from letsencrypt with cert-manager (using helm)


NOTE: 1 year after i wrote this, I found it in my “drafts”. I don’t recall why i haven’t published it. Since 1 year has passed, I decided to publish AS-IS.

There are only guides but it took forever (aka more than 1 day) to set everything up and working. Here a list of the things I did to make everything working.

The result is that:

  • Nginx is used as ingress, (nginx-ingress) and an ingress resource is used to route to your service
  • TLS for the connection, issued by letsencrypt
  • static IP and DNS set up to your domain

Let’s go step by step.

0. Assumptions:

It’s assumed that you have a Kubernetes cluster with services running, Helm installed and working.

Setup a static IP and DNS

From the Google console create a static IP (give a name you like), not it down somewhere.
Create a DNS record that points to that IP, in my case it’s api.k8s.chino.io

Helm Templates

The tricky part is to have a correct helm configuration (then generate Kubernetes instructions correctly). In the templates folder, I’ve this ingress.yaml file


{{- if .Values.ingress.enabled -}}
{{- $serviceName := include "fullname" . -}}
{{- $servicePort := .Values.service.targetPort -}}
apiVersion: extensions/v1beta1
kind: Ingress
metadata:
name: {{ template "fullname" . }}
labels:
app: {{ template "fullname" . }}
chart: "{{ .Chart.Name }}-{{ .Chart.Version | replace "+" "_" }}"
release: "{{ .Release.Name }}"
heritage: "{{ .Release.Service }}"
annotations:
{{- range $key, $value := .Values.ingress.annotations }}
{{ $key }}: {{ $value }}
{{- end }}
spec:
rules:
– host: "{{ .Values.ingress.dnsNames }}"
http:
paths:
– path: /
backend:
serviceName: {{ $serviceName }}
servicePort: {{ $servicePort }}
{{- if .Values.ingress.tls }}
tls:
{{ toYaml .Values.ingress.tls | indent 4 }}
{{- end -}}
{{- end -}}

view raw

ingress.yaml

hosted with ❤ by GitHub

(note that your deployment must use ClusterIP and the port is the targetPort, in my case is 8000 and not 80)

then I created a certificate.yaml


apiVersion: certmanager.k8s.io/v1alpha1
kind: Certificate
metadata:
name: {{.Values.certificate.secretName}}
spec:
secretName: {{.Values.certificate.secretName}}
issuerRef:
name: {{.Values.certificate.certIssuer}}
dnsNames:
– {{.Values.certificate.dnsNames}}
acme:
config:
– http01:
ingressClass: {{.Values.certificate.ingressClass}}
domains:
{{- range .Values.certificate.domains }}
– {{ . }}
{{- end }}

and this in values.yaml


certificate:
secretName: chino-io-tls-prod
certIssuer: letsencrypt-prod
dnsNames: api.k8s.chino.io
ingressClass: nginx
domains:
– api.k8s.chino.io
ingress:
dnsNames: api.k8s.chino.io
enabled: true
annotations:
kubernetes.io/ingress.class: nginx
certmanager.k8s.io/cluster-issuer: letsencrypt-prod
tls:
– secretName: chino-io-tls-prod
hosts:
– api.k8s.chino.io

view raw

values.yaml

hosted with ❤ by GitHub

Briefly, this will create an ingress for the service that resolves the url set in the values. Plus creates a certificate, using the letsencrypt prod system (you can use staging for test environment, we go on this later on).

Install nginx-ingress

First of all install nginx-ingress using helm, set it to use your static ip.

helm install --name nginx-ingress --set controller.service.loadBalancerIP=YOURSTATICIP stable/nginx-ingress

Install cert-manager

First, create the issuer by using this yaml file


apiVersion: certmanager.k8s.io/v1alpha1
kind: Issuer
metadata:
name: letsencrypt-prod
namespace: default
spec:
acme:
# The ACME server URL
server: https://acme-v02.api.letsencrypt.org/directory
# Email address used for ACME registration
email: email@example.com
# Name of a secret used to store the ACME account private key
privateKeySecretRef:
name: letsencrypt-prod
# Enable the HTTP-01 challenge provider
http01: {}

(the value letsencrypt-prod is used in the values.yaml and links to this one)

Then launch the cert manager with helm

helm install --name cert-manager stable/cert-manager

this will take care of generating the certificate.

Launch your helm

launch the helm that you updated at the beginning. everything should be working and having the TLS enabled.


Sentry.io Relases + Docker + Fabric + Git


Ok, the title is not explicative but match quite well with Google.
We (chino.io/consenta.me) switched from the old but dismissed OpBeat to sentry.io . Although functionalities are similar, the setup is not so straightforward as it was in OpBeat, and the docs miss useful script such as the one of fabric.
Here I will show you how I created a Fabric script to tag version in GIT (git tag) and use it to create Releases in Sentry and also connect it to the git commit. Everything integrated with Django and Docker (if you use Docker you can’t rely on the “revision” 'release': raven.fetch_git_sha(os.path.abspath(os.pardir) since the docker will not have the folder.git.

First, in Fabric, I created a function to add a new tag for every release. The version number are of this format X.Y , every release on test increases Y, thus 0.1, 0.2, 0.3; releases in production increases X and reset Y, thus: 0.3->1.0->2.0 etc

@task
def current_tag():
tag = local('git describe --tags $(git rev-list --tags --max-count=1)', capture=True)
return tag
@task
def new_tag(test):
#create new tag
if type(test) != bool:
test = strtobool(test)
try:
last_tag = current_tag()
except:
last_tag = '0.0'
versions = last_tag.split('.')
if test:
# we change the last number 0.X+1
versions[1] = str(int(versions[1]) + 1)
else:
# if prod we change the first X+1.0
versions[0] = str(int(versions[0]) + 1)
versions[1] = "0"
tag = ".".join(versions)
print(green("new tag %s " % tag))
return tag
@task
def git_tag(tag=None, message='tag version', test=True):
if not tag:
tag = new_tag(test=test)
local('git tag -a "%s" -m "%s"' % (tag, message))
local('git push origin %s' % tag)
view raw tag.py hosted with ❤ by GitHub

I then modified the settings of Raven to get the version from the environment file. I also created a function for fabric to update the value in the file.env.

#this goes in settings.py
RAVEN_CONFIG = {
'dsn': env("SENTRY"),
//taken from .env file, use django-environ
'release': env('RELEASE'),
'env': SERVER
}
#function to update the .env file, goes in fabric.py
def update_version(version, file='.env.dev'):
#update the RELASE line with the new version
with open('configs/' + file, 'r+') as f:
lines = f.readlines()
f.seek(0)
f.truncate()
for line in lines:
if line.startswith('RELEASE'):
line = "RELEASE=%s" % version
f.write(line)
view raw config.py hosted with ❤ by GitHub

In this way Sentry automatically gets the version when deployed, the version is the same as the Git tag.

Last, I’ve added the call to bind to the release the git commits. This is not too clear from the documentation.

@runs_once
@task
def register_deployment(git_path, version=None):
# usualy is '.' if same folder
with(lcd(git_path)):
if not version:
version = current_tag()
url = "https://sentry.io/api/0/organizations/<YOUR_ORGANIZATION>/releases/&quot;
revision = local('git log -n 1 --pretty="format:%H"', capture=True)
headers = {"Authorization": "Bearer %s" % django_settings.SENTRY_AUTH}
payload = dict(version=version, refs=[dict(repository='<YOUR_REPOSITORY>', commit=revision)],
projects=("<YOUT_PROJECT>",))
res = requests.post(url, json=payload, headers=headers)
view raw register.py hosted with ❤ by GitHub

You have to change the value accordingly to your setup.

  • YOUR_ORGANIZATION is in the Organization settings, the first value
  • SENTRY_AUTH (which is load from the env) is the auth created from here
  • YOUR_REPOSITORY is under organization -> repositories https://sentry.io/settings/<your_organization>/repos/ copy the title.
  • YOUT_PROJECT is the project name.

Now, when I release the code I do (among many other things such as committing to git and building docker):

  • tag the deployment
  • update the .env file and the release with the tag from above
  • bind the commits to the release


This took me a couple of hours to figure it out. OpBeat used to have a single fabric script that handled everything and a easier integration with Git Repo. Now I achieved pretty much the same with sentry


That’s all folks

Django – Iframe – Internt explorer : problems SEC7111


I’m recently making the use of Iframe and postmessages for running a project. I run into problems while testing it for Internet Explore (not a news).

The fact is, IE is pretty bad also at stating errors, the only things that it says is that the form where blocked for security reason saying

SEC7111

I initially thought of the X-Frame-Option, and with django you can fix it by annotating the view with @xframe_options_exempt. This works but not when you POST to a view within the Iframe. This beacuse Django uses CSRF cookie while IE blocks cookie of  a third party.

The soluition is pretty easy: THERE’S NO SOLUTION. As explained in this ticket.  The best one seems to be the one of not using Iframe. Or to remove CSRF for that specific view.

A thing that took me forever to solve this problem is the fact that django can’t show you the page 403 since it’s protected for Iframing (you need to rewrite the 403handler, maybe the 403csrfhandler if existsts) and then IE tells you that the page can’t be displayed for security reasons, which at first sights it’s impossible to grasp the reason.


“Beautiful” Django widget for Multi Selection


widtget.png
Left: django default widget / Right: final result

To be honest django is terrific, but in order to be general enough it lacks some look and feel and other stylistics things. One of the problem with forms, which generally work great, is with multi selections. You can have an item list or a checkbox list, like in the 90s. I decided to build a widget to render in a nice fashion the multi-selection case. It took me more than expected, roughly an afternoon, but I run into various problem and I’d to hack a bit the widgets. One of the biggest problem was to access the model.object in the widget since i want to display more data than just the label. Another problem that stucked me for a while was the fact that with crispy form the widget_template overiding seems not to be working (issue here).

Since I want to write less code as possible, the ingredients are:

  • use Class Based view
  • use Model Forms

And the final solution I made allowed me to cut ~50% of the code. Less code you write less bug you make.

The code, once made, is not complex. However, getting there took some time. Let’s start from the view.

class MyVIew(CreateView):
template_name = "my_template.html"
form_class = MultipleChoiceForm
def get_form_kwargs(self):
ctx = super().get_form_kwargs()
ctx.update({'qs':THE_QUERYSET})
return ctx
view raw views.py hosted with ❤ by GitHub

https://gist.github.com/esseti/441f9a4da1b69f1b6c6061432bcc640e.js

rewriting the get_context  function is done for being able to pass a queryset to the formThis allows us to have two benefits:

  • we are able to display in the form field only the data that we want and not the entire list of items present in the database
  • we can pass the queryset into the widget part, usually widgets do not have access to the context

To do so, we have to modify a bit the Form

class MultipleChoiceForm(ModelForm):
class Meta:
model = MyModel
fields = ('myChoices',)
widgets = {
'myChoices': MyWidget,
}
def __init__(self, qs, *args, **kwargs):
# this is set in get_form_kwargs of the view
super().__init__(*args, **kwargs)
#this is needed to display only the data that matches the query
self.fields['myChoices'].queryset = qs
#this is needed for the rendering
self.fields['myChoices'].widget.qs = qs
view raw forms.py hosted with ❤ by GitHub

As you can see we set the queryset of a inner field and also to as widget.qs value. Note that the widget of the field is linked to the brand new widget I just made.

class MyWidget(forms.widgets.CheckboxSelectMultiple):
template_name = 'web_admin/partial/checkbox.html'
option_template_name = 'web_admin/partial/panel_item_p.html'
def get_context(self, name, value, attrs):
ctx = super().get_context(name, value, attrs)
# update the context adding the qs
ctx.update(dict(qs=self.qs))
return ctx
view raw widget.py hosted with ❤ by GitHub

For the widget, I had to extend and overwrite the get_context function in order to load a specifc value from the context. This is a bit of hack, since widget should not know the request or context data, but I need it!

Finally, in the templates (that you see in the form variable) I made the bootstrap panels where I displayed the widget and other information (directly from the object).

The first template is pretty standard

{% with id=widget.attrs.id %}
{% for group, options, index in widget.optgroups %}
{% for option in options %}
{% with widget=option %}
{% include widget.template_name%}
{% endwith %}
{% endfor %}
{% endfor %}
{% endwith %}
view raw checkbox.html hosted with ❤ by GitHub

The second one has a piece of code to load from the qs  variable the correct item that is displayed within the widget.

{% load consenta_utils %}
{% with item=qs|index:widget.index %}
<div class="col-md-3 ">
<div class="panel purpose panel-default {% if widget.attrs.checked %}panel-primary{% endif %}"
style="cursor: pointer;">
<div class="panel-heading ">
<!-- this is the standard for the checkbox from django . i suggest to hide this in the class-->
<!-- the click on the div .panel checks the checbox (see js) -->
<input type="checkbox"
name="{{ widget.name }}"
{% if widget.value != None %}
value="{{ widget.value|stringformat:'s' }}"
{% endif %}
{% for name, value in widget.attrs.items %}{% if value is not False %}
{{ name }}{% if value is not True %}="{{ value|stringformat:'s' }}"{% endif %}
{% endif %}{% endfor %}/>
</div>
<div class="panel-body">
{{ item.description }}
</div>
</div>
</div>
{% endwith %}
view raw panel.html hosted with ❤ by GitHub

To do so I had to create a filter to get the item from the list

from django import template
register = template.Library()
@register.filter
def index(List, i):
return List[int(i)]

I also add some JS to make the whole panel green when selected.

$(document).ready(function () {
//this makes all the panels of the same size
function resize_panel(selector, what) {
if (what == undefined)
what = '.panel-body';
var objs = $(selector).find(what);
var o_h = 0;
objs.each(function () {
if (o_h < $(this).height()) {
o_h = $(this).height();
}
});
objs.each(function () {
$(this).height(o_h);
});
};
resize_panel('.panel', '.panel-heading');
resize_panel('.panel', '.panel-body');
resize_panel('.panel', '.panel-footer');
//this adds panel-primary (green stuff) to the panel when checkbox is selected
$('.purpose').click(function () {
var checkbox = $(this).find('input[type=checkbox]');
console.log($(this));
checkbox.prop("checked", !checkbox.prop("checked"));
if (checkbox.prop("checked")) {
$(this).addClass('panel-primary');
} else {
$(this).removeClass('panel-primary');
}
});
});
view raw script.js hosted with ❤ by GitHub

For full code write a comment here and I’ll provide it.

A full set of the gist is here

Final

This is the result

final.png

  • It works
  • It’s (somehow) better than the plain one and quite reusable
  • It took longer than expected to implement it

Route53 and email (forwarding)


AWS is great, it has a ton of services to do whatever you had in mind and even things that you may not even thought about.

One of the services they offer is Route53, the DNS manager . I did use it to map to my loadbalancer. I moved the DNS from namecheap to AWS . The problem is that Route53 does not handle email (not forward nor anything).

There are several solutions, but the one I found the easiset is the one that involves mailgun . It allows you to forward emails to another email of yours (e.g. your gmail account), for free (right now). It should be even possible to use it as mail provider, but I never investigate that part.

To setup the email forwarding with mailgun:

  • subscribe to the service
  • create a domain, use the full domain as name without the www (don’t use the subdomain as suggested, read their docs for more info)
  • follow the DNS setup as explained by their webpage.
  • Once set up, create a route
    • Expression type: custom
    • raw expression: match_recipient(“.*@YOURDOMAIN.COM”)
    • actions: forward – YOUR EMAIL
  • Test the route with the tool at the bottom

Note that you need the raw expression beacuse in mailgun the routes are cross domain.

Mac: Volume + Play/Stop without special buttons


Edit: use karabiner

I’m using an external keyboard beacuse my mac keyboard is falling apart and on top of it I use an external screen. The keyboard I’ve is pretty basic so it does not have the special keys to change volume, set mute, play stop spotify. but there’s a soltuion.. apple script

Create an apple script (service):

  • open automator
  • select service
  • on top select “no input”
  • on the left side sarch for “Run Apple Script”

Then you can add various behaviour, for example the one for volume is (this one is volume up, for volume down is the same with 0 and minus, for mute set it to 0)


set vol to output volume of (get volume settings)
if vol > 90 then # 100 max
set volume output volume 100
else
set volume output volume (vol + 5)
end if

Or to stop/playing spotify you can use

 if application "Spotify" is running then
 tell application "Spotify"
 playpause
 end tell
end if 

Once saved (with the name you like the most), open:

  • System Preferences
  • keyboard
  • Shortcuts
  • Services
  • And on the bottom you will find all your scripts
  • Just assing a shortcut

Now you have full control even if you don’t have smart buttons . Personally I’ve:

  • volume up/down on cmd+alt+arrow up/down
  • mute cmd+alt+0
  • start/stop spotify cmd+alt+spacebar